Feeds:
Posts
Comments

Archive for the ‘Vegetarian’ Category

I probably haven’t yet mentioned how much I like Thomas Keller’s book Ad Hoc at Home. This is one of the few cookbooks I have seen where I feel drawn to make nearly every single recipe. The picture of this salad in the book stood out to me since I got the book last Christmas, so I finally made it as an accompaniment to bison New York strip steaks for a special dinner. This salad would be great with any simple grilled meat, and it really got me excited about burrata cheese. I had heard a lot about burrata, but I am not sure I’d ever had it before making this recipe. Burrata is a soft type of mozzarella with a creamy, almost-liquid center. Whole Foods makes it in-store, so it’s pretty easy to find. The only downside is that because it’s so soft, you have to buy a whole round – it’s not sold by the pound. This can get pricey, but if you’ve never had it before, it’s definitely worth trying. Mine came wrapped in banana leaves and plastic wrap, and I was really interested to see what it would be like inside. It’s delicious, and I am now on the hunt for other good recipes using it.

In all, this salad proves why Thomas Keller is widely considered America’s best chef. It’s composed of fairly simple ingredients, but each one gets special attention, and it’s a perfect combination of different flavors and textures. The original includes shaved red onion, but I don’t like raw onion, so I skipped that.

Broccolini and Burrata Salad

Source: Ad Hoc at Home by Thomas Keller (adapted slightly)

ingredients

  • 1 pound broccolini,  thick ends removed and remaining stems peeled slightly, as in photo above
  • 3 large cremini mushrooms, stemmed and cleaned
  • 1/2 cup black Cerignola olives (it’s pretty important to get this particular kind because they are milder than most other olives. Whole Foods carries them on the olive bar.)
  • Kosher salt and fresh black pepper
  • Burrata cheese (the smallest round you can find, but you will definitely have leftovers)
  • Extra virgin olive oil
  • Sherry vinaigrette (see recipe below)

instructions

1. Bring a large pot of water to a boil. Salt generously before adding broccolini. While water is coming to a boil, prepare a large bowl of ice water. When water boils, add the broccolini and blanch until crisp-tender, about 4 minutes. Submerge broccolini in bowl of ice water to stop the cooking, then drain and pat dry with paper towels.

2. Cut the mushroom caps into paper-thin slices. I used a sharp paring knife, but the book suggests that a Japanese mandoline also works well. Place in a small bowl.

3. Cut all 4 sides of each olive away from the pit in flat slices. Lay the slices flat-side-down and cut into thin slices, as seen in photo above.

4. Lay the broccolini in a single layer on a plate and drizzle with about 2 Tbsp. vinaigrette (see recipe below). Toss with your hands to coat. Sprinkle with additional salt or pepper if desired. Add 1 Tbsp. vinaigrette to the bowl with the mushrooms, and toss to coat, adding a bit more if needed. Move broccolini to serving platter and top with marinated mushrooms, then sliced olives.

5. Place the burrata in a small serving bowl. Using kitchen shears, cut a small X in the top of the burrata to expose the creamy center. Drizzle with a little olive oil and sprinkle with pepper. Add the bowl of burrata to the serving platter. Serve salad with tongs and a spoon for the burrata. Each person can top their own serving with the burrata.

Sherry vinaigrette

Whisk together 2 Tbsp. sherry vinegar and 2 Tbsp. red wine vinegar in a small bowl. Stream in about 1/2 cup olive oil (the dressing will still look slightly broken – do not emulsify completely), and season with salt and pepper to taste. Whisk in more olive oil if dressing is too tart. Unused dressing for the recipe above will save in the fridge.

Read Full Post »

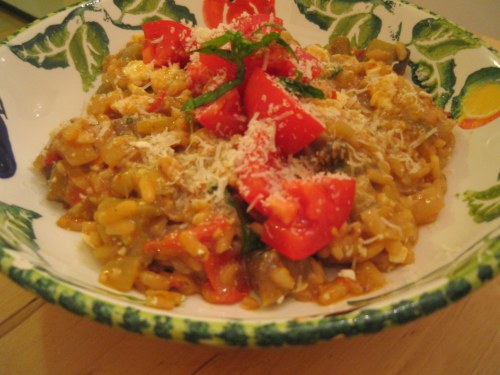
eggplant risotto

I rarely use specific recipes when making risotto – to me, risotto is a blank canvas, like pasta, waiting for the next combination of ingredients I can come up with to put in it.  However, on our honeymoon last year, I was reading a particularly good issue of Food and Wine which featured this risotto recipe in an article about cruising the Mediterranean with Jacques Pepin.  I went back to that issue recently, where I re-encountered this recipe and immediately decided to finally put this specific risotto on my weekly menu.

This risotto was a perfect blend of flavors.  It really tasted like all of the great flavors in a good eggplant parmesan combined in each bite.  The only changes I made were to add the fresh tomatoes later in the cooking process than they instruct, in order to preserve more of their fresh taste and texture, and to make sure that I cooked the risotto in the same pan as the eggplant, scraping up the browned bits into the rice.  This gave the finished dish extra flavor.  I also used butter to start the risotto instead of olive oil and added white wine as that’s just the traditional way that I know. A key ingredient in this dish is ricotta salata, which is a dried, crumbly cheese with a slightly smoky taste.  We liked it with the ricotta salata, but Craig was less sure about it than I was.  In keeping with the Mediterranean theme, I think this recipe would also work great with feta in place of the ricotta salata, and I might try that as well.

Eggplant and Tomato Risotto with Ricotta Salata

Recipe from: Food and Wine, May 2008

ingredients

2 Tbsp. extra-virgin olive oil

1 pound eggplant, peeled and cut into 1/2-inch dice

3 garlic cloves, minced

Salt and pepper

1/3 cup dry white wine or vermouth

4 cups chicken stock or low-sodium chicken broth (or vegetable broth, for a fully vegetarian dish)

1 small Vidalia onion, minced

1 pound tomatoes, coarsely chopped

1 cup Arborio rice

3 Tbsp. unsalted butter

1/2 cup crumbled ricotta salata (2 ounces)

2 tablespoons freshly grated parmesan cheese

1/2 cup julienned basil

directions

1. In a large sauté pan with high sides (the same pan you want to use for the risotto), heat the olive oil. Add the eggplant and cook over moderately high heat, stirring occasionally, until browned all over. Add the garlic, salt, and pepper, and cook, stirring, until fragrant, about 1 minute longer. Transfer the eggplant to a bowl and set aside.

2. In a saucepan, bring the chicken stock to a rapid simmer. In the sauté pan, heat 2 Tbsp. of butter. Add the onion and cook over moderate heat until softened, about 5 minutes. Add the rice and cook, stirring, until thoroughly coated, about 2 minutes.

3. Add the wine and cook, stirring and scraping up the browned bits in the pan, until the wine is nearly absorbed. Add the hot stock 1 cup at a time and stirring until it is absorbed between additions. When the rice is about half cooked, add the chopped tomatoes, reserving a small handful for garnish. The risotto is done when the rice is al dente and suspended in a creamy liquid, about 25 minutes total.

4. Remove the risotto from the heat. Vigorously stir in the remaining 1 Tbsp. butter, then stir in the ricotta salata and parmesan cheeses. Stir in the eggplant and basil, reserving a little basil for garnish. Season with salt and pepper and transfer to bowls. Garnish with reserved chopped tomatoes and basil. Serve right away.

Read Full Post »

koshary

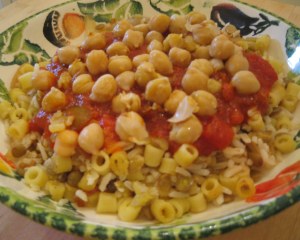
For a long time (as in, 5 years!), I had been wanting to make a version of a dish my husband loved on his study abroad trip to Egypt. The only problem was, the dish isn’t at all common in the U.S., and since I wasn’t there, I had never tried the dish before. That made it hard to know if the recipes I saw online, most of which were vague and seemed not to be written by native English speakers, would turn out similar enough to bring him back to his good memories of the dish. When I stumbled across an article about the dish on Gourmet’s website, written by an American chef and calling for cooking each ingredient separately, I knew I had found my challenge.

Koshary is sometimes referred to as “Egypt’s national dish.” It’s a street food classic that combines lentils, rice, mini pasta, and chickpeas, all covered with a spicy tomato sauce and fried or carmelized onions. It sounds strange, but what I learned after eating it (and enjoying it very much) is that this dish is ALL about the texture. The combination of different textures makes this dish addictive and tasty.

It was a lot of fun to tease Craig about making him a “surprise dinner” and give him clues to see if he could figure it out. Some of the clues I gave him were that it was a vegetarian meal and that I had never had it before. What finally tipped him off was when I complained, after standing over 3 burners on a hot day, that I didn’t know how people in its country of origin could stand making it given the hot weather. After tasting it, he said that this version tasted pretty authentic, although he would have liked it spicier, and he really appreciated that I made it for him as a way of remembering his trip. I will make this again – it’s good! If you try this (and I hope you do), I think my version minimizes the number of dirty dishes and streamlines things over the original I’ve linked to.

Egyptian Koshary

adapted from: Francis Lam, gourmet.com

ingredients

1 large onion, sliced thinly

6 oz dry lentils, picked over and rinsed

8 oz small pasta (I used ditalini, which was great, but you can also use elbow mac)

1 cup (uncooked) basmati rice

1 can (15 oz.) chickpeas, rinsed and drained

dash ground cinnamon

1 tsp cumin

1/2 tsp coriander

3 cups homemade or store-bought arrabiata, fra diavolo, or other spicy tomato sauce

Hot sauce

Extra-virgin olive oil

Salt and pepper

Note: you will need a skillet, a pasta pot, a saucepan, and a large bowl in order to cook all of the ingredients separately.

directions

1. In the skillet, caramelize the onion. Coat the bottom of the pan with oil and heat over medium-high. Get it hot, so that the onion sizzles when it goes in. Quickly toss to coat the onion in oil, then turn the heat down to low or medium-low. Stir it occasionally while it’s still pale, then more frequently when it starts to take on color, so that it caramelizes evenly. It will take at least 20 minutes to caramelize. Once they are done, remove from heat and set aside.

2. Meanwhile, in the pasta pot, bring water to a boil to cook the macaroni.  Once it boils, cook the pasta to al dente. Here is the trick to saving time in cooking all the ingredients separately – reserve most of the boiling water by pouring it into a large bowl. Drain the pasta and toss with a little olive oil so that it won’t stick while it’s cooling.  Cool completely. 

3. Return the hot water to the pasta pot and return it to a boil. When it boils, add the lentils. Turn it down to a lazy simmer, and cook partially covered, checking them after 20 minutes. Cook to al dente, which will probably take about 25 minutes. Drain the lentils and let them cool slightly.

4. While the lentils are cooking, cook the rice in the saucepan. Bring the rice, 2 cups of water, and the cinnamon, cumin, and coriander to a boil. Reduce heat to low, cover, and cook 15-20 minutes according to package directions. Once it’s done, remove the pot from the heat and set aside to let rest, covered, for 5 minutes. Then, remove the cover and season with salt and pepper. Transfer to the large bowl. Fluff with a fork and let cool slightly.

5. Meanwhile, in the now-empty saucepan, warm up the spicy tomato sauce, adding more hot sauce if desired (or, each person can add more to their own serving).  While that’s happening, heat some olive oil in the skillet. Get it really good and hot, and throw in your pasta. Don’t touch it for a minute; let it get a bit brown and crusty. Toss it, and let it toast for a while.

6. Combine the pasta with the rice in the large bowl, then add the lentils. Sear the chickpeas slightly in the skillet. Add the onions to the pasta, rice, and lentil mixture and toss to combine. Add more salt and pepper to taste. To assemble the dish, add a serving of the mixture to a shallow bowl. Top with the warm tomato sauce, then garnish with the toasted chickpeas. Serve with additional hot sauce if desired.

Read Full Post »

chickpea burgers

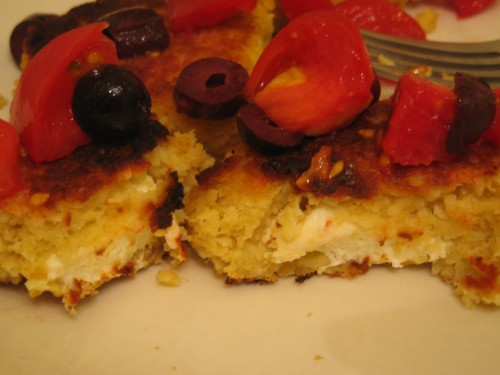
I flew by the seat of my pants a bit with this dish, but it ended up being a delicious vegetarian dinner. I was inspired by the stuffed chickpea patties I saw over at 101 Cookbooks, a vegetarian and natural foods cooking site. Her thought is that veggie burgers don’t need buns, because the beans provide enough of a bread-y texture. Instead, the burgers themselves should act as buns, and they should be stuffed with interesting ingredients. I agree, and decided to stuff mine with some cotija I had on hand and let it melt in there a little – cotija doesn’t melt much at all, so you could use a slightly meltier cheese, like manchego, if you wanted. These burgers cook on low heat for awhile, though, so you wouldn’t want to use a softer cheese than that. As a topping, I decided on an heirloom tomato and kalamata olive relish with a vinegar-y bite. These were really tasty, especially served with the oven fries I made. A great, healthy vegetarian twist on burgers and fries.

Cotija-stuffed chickpea “burgers” with tomato-olive relish

Inspired by: Veggie burger recipe at 101 Cookbooks

ingredients

1 can chickpeas, rinsed and drained (I prefer Goya)

1 egg

¼ cup canola mayo

½ medium onion, cut into chunks

1 garlic clove, crushed

Juice of ½ lemon

½ cup panko breadcrumbs

Salt, pepper, and ground cumin to taste

6 pieces cotija cheese – the pieces should be sliced so as to resemble thin pats of butter

1 Tbsp. olive oil, for cooking the patties


For the relish:

1 very large heirloom tomato, roughly chopped

8 or so pitted kalamata olives, sliced

Generous drizzle of olive oil (about 1 tsp.)

Splash of red wine vinegar (about ½ tsp.)

Salt and pepper to taste


directions


To make the burgers:

1. Place the chickpeas, egg, mayo, onion, garlic, and lemon juice in a food processor. Process on medium speed until well-combined but still chunky. Add the salt, pepper, and cumin and pulse to combine. Turn the mixture into a mixing bowl and fold in the panko crumbs. Let the mixture rest for a few minutes so that the crumbs absorb some liquid. At this point, the mixture should be very moist, but should still form patties without sticking to your hand. Add a little water or mayo if it’s too dry, or some more breadcrumbs if it’s too wet.


2. Grab about 1/6 of the mixture (it should be large meatball-sized), and form into a 1-inch thick patty. Press a piece of cotija cheese gently into the center, and bring the edges of the patty up around the cheese so that it is completely covered. Repeat to form 6 burgers.


3. Heat olive oil over medium-low heat in a cast iron skillet (a regular skillet would probably work, too, but I like the extra browning that cast iron gives to the burgers). When the oil is hot, add the burgers and cover. Cook, covered, for about 8 minutes per side.


4. Meanwhile, make the relish – combine all in ingredients in a small, non-reactive bowl and toss to combine.


5. To serve, plate patties and spoon some relish over each one. Serve with oven fries and enjoy!

Read Full Post »

Texas caviar

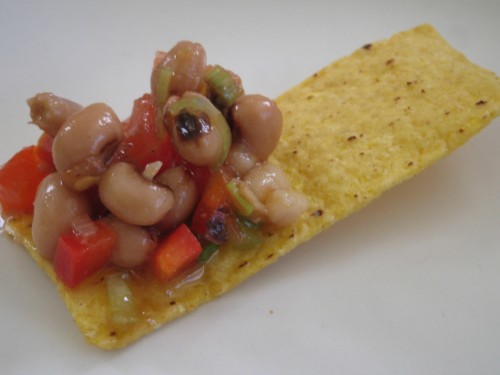
For my second selection for Dinner Divas (see below for my first), I chose this Texas caviar recipe. If you are not familiar with Texas caviar, it is essentially a black-eyed pea salsa. I thought it was very appropriate to make these black-eyed peas during the first week of the new year, since they’re supposed to be eaten on New Year’s Day for luck. This dip is so delicious! We could not stop eating it. I will definitely be making this again as a side or appetizer in the future. I made a few changes from the original, so feel free to check the link if you want to see the recipe that claims to be from the “Cowgirl Hall of Fame.” Note that this recipe is one that definitely needs to sit in the fridge overnight for the flavors to marry. I couldn’t believe how different it tasted when we went to eat it than it had when I made it and tasted to check the seasoning the day before.

Texas caviar

Adapted from: Epicurious

ingredients


1 can black-eyed peas, drained and rinsed

3 jarred roasted red peppers, chopped

4 scallions, thinly sliced, green part only

½ Tbsp. hot sauce (I use Cholula)

½ Tbsp. Worchestershire sauce

Salt and pepper

6 pickled jalapeño chile slices, finely chopped

1 firm, ripe, chopped tomato

Vinaigrette (the original recipe just called for this without specifying, so I whisked together about 2 Tbsp. white wine vinegar, salt, and a generous dash of ground cumin with 3-4 Tbsp. of olive oil)

½ fresh red bell pepper, finely chopped

2 cloves fresh garlic, pressed or minced


directions

Combine all ingredients in a large bowl and fold together with a spatula until well combined. Refrigerate overnight, in a covered container. Serve with saltine crackers or corn tortilla chips.

Read Full Post »

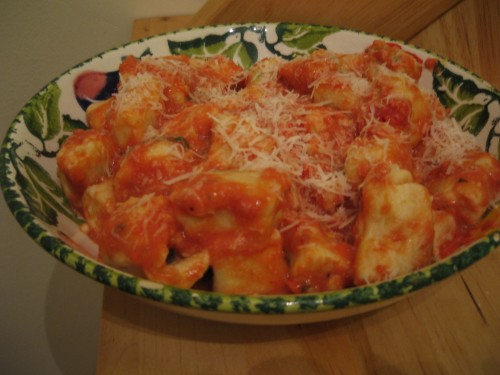
gnocchi

Ok, so I have been meaning to post this recipe for awhile. I made this dish in celebration of six months of marriage, which was on November 17. So yes, I am a slacker for not posting it sooner! The reason I wanted to make this dish for a special occasion (and six months of marriage fell not long after we marked 6 years together, so it was extra-special), is that this is our favorite dish to order at Maggiano’s. We have gone to Maggiano’s on numerous occasions just to order a big plate of their ricotta gnocchi in vodka sauce to share with a salad. When I saw a very similar recipe that I could try at home, I knew I wanted to make it. This came out very tasty. I think it was almost as good as the Maggiano’s version, and it was certainly made with more love! As a bonus, ricotta gnocchi are probably a little easier to make than potato gnocchi. Try it!

Ricotta gnocchi with tomato-cream sauce

Adapted from: Cook’s Illustrated

ingredients

for the gnocchi:

16 oz. whole milk ricotta cheese (must use whole milk ricotta, not part-skim)

2 slices of white bread, crusts cut off and torn into quarters

1 egg

2 Tbsp. minced fresh basil leaves

Salt and pepper

All-purpose flour

½ cup grated parmesan cheese, plus more for serving


for the sauce:

1 Tbsp. extra-virgin olive oil

1 large garlic clove, minced

1 14.5 oz. can low-sodium plain tomato sauce

Salt to taste

1/8 tsp. sugar

2 Tbsp. chopped basil leaves

2-3 Tbsp. heavy cream, at room temperature


directions

To prepare gnocchi:

1. Line a fine mesh strainer with a triple layer of paper towels.  Place ricotta in strainer, cover with a plate, and refrigerate for 1 hour. You can put another plate underneath to catch any dripping liquid, but mine did not have any – the paper towels absorbed it all.

2. Meanwhile, preheat oven to 300 degrees.  Process bread pieces in a food processor until finely ground.  Spread crumbs on a baking sheet and bake until dry and slightly golden, about 10 minutes. Let cool.

3. Place ricotta in food processor and pulse to a fine, grainy consistency, about eight quick pulses. Transfer to a large bowl and fold in egg, basil, salt and pepper with a rubber spatula.  Add 6 Tbsp. of flour, parmesan, and bread crumbs and stir until well combined.  Refrigerate for 15 minutes.

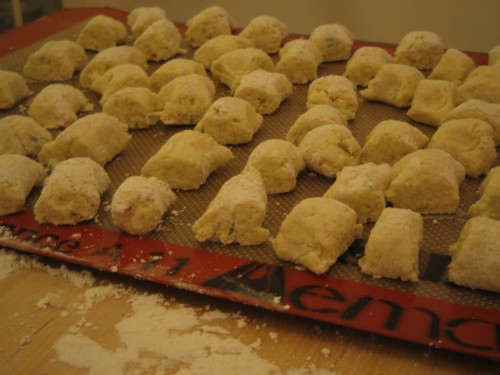
4. Check the texture of the dough.  It should roll into a ball easily, leaving few crumbs on your hands.  Add more flour if necessary to achieve this texture (I didn’t need to do this).  Dust work surface and hands with flour.  Roll a lemon-sized piece of dough into a ¾-inch rope, rolling from the center outward.  Cut rope into ¾-inch long pieces and transfer to a parchment or silicone-lined baking sheet.  Repeat with remaining dough.

5. Bring a large pot of lightly salted water to a boil. Reduce heat to a simmer and cook gnocchi at a simmer in 2 batches.  Once all pieces float to the surface, continue to simmer for 2 minutes before removing with a slotted spoon.  Repeat with second batch.


While water is heating, prepare sauce:

1. Heat oil in a high-sided skillet over medium heat until shimmering.  Add garlic and cook 20 seconds.  Stir in tomatoes, salt, and sugar and simmer 5 to 6 minutes.  Turn off heat and stir in basil and cream.  Check seasoning.

2. Gently fold gnocchi into sauce.  Serve immediately with additional grated parmesan.

Serves 3 as a main course.

dressed gnocchi

Read Full Post »

Indian feast!

Tonight I cooked up an Indian-inspired feast, and it turned out really great. I made chicken tikka masala awhile back and was amazed at how juicy the yogurt coating kept the chicken. I wanted to make that chicken again, but minus the masala. While that was tasty, I wanted something slightly healthier and wanted to branch out on my own. I was really proud of how the chickpeas and spinach came out with very little recipe guidance, and the chicken was as juicy as last time. What made this truly a “feast” is that I served it with both oven-baked brown rice and a piece of storebought garlic naan. Even my husband, who is skeptical of Indian food, went out of his way to say how much he liked this meal.

I am filing this under the “Vegetarian” tab as well since you could easily make a meal out of the chickpeas and spinach over rice, which would make for a tasty meatless option.

Tandoori Chicken

Adapted from: a combination of this Food Network recipe and Cook’s Illustrated


ingredients

1 cup plain yogurt

½ teaspoon garlic powder

¼ teaspoon smoked paprika

½ teaspoon ground cumin

½ teaspoon ground turmeric

1 teaspoon minced fresh ginger

½ teaspoon salt, or to taste

¼ teaspoon freshly ground pepper

¼ teaspoon ground cinnamon

¼ teaspoon garam masala (optional)

¼ teaspoon ground cayenne

2 boneless skinless chicken breasts


directions

1. Combine all spices and yogurt in a large bowl. Marinate chicken breasts in yogurt mixture for one hour.

2. Preheat the broiler. Line a baking sheet with foil and let chicken breasts drain slightly before placing on baking sheet.

3. Broil chicken until internal temperature reaches 160 degrees and coating is lightly charred in spots, turning once during cooking. This should take about 20 minutes total.

4. Remove chicken to a plate and let rest 5 minutes before slicing.


Indian-Inspired Chickpeas and Spinach in Creamy Tomato Sauce

Adapted from: my head

ingredients

One can chickpeas (I like Goya), drained and rinsed

4-5 large handfuls baby spinach (about 4 oz.)

1 ½ cups low-sodium plain tomato sauce

1/3 cup whipping cream, at room temperature

2 cloves minced garlic

1 tsp. grated fresh ginger

½ Tbsp. olive oil

¼ tsp. Asian chili garlic sauce

¼ tsp. ground cayenne

¼ tsp. curry powder

½ tsp. ground cumin

¼ tsp. ground coriander

½ tsp. garam masala

½ cup water


*Note: I did not measure the spices, so these proportions are approximate, and you should feel free to adjust to your tastes. I tried to underestimate the amounts I used so that more of any particular spice could be added according to your preferences.


directions

1. Heat olive oil in a large saucepan over medium heat. Add garlic and ginger and cook 2-3 minutes. Add chickpeas and toast, stirring frequently, for another 2 minutes or so.

2. Add tomato sauce and bring to a simmer. Stir in all remaining spices and check seasoning, adding more of your favorite spices if desired.

3. Whisk in cream and return to a gentle simmer, stirring frequently.

4. Begin adding spinach in batches, adding small amounts of water as necessary to wilt the spinach and keep sauce at desired thickness.

5. Once all spinach is added and wilted, turn the heat down very low and cover. Simmer 5 minutes covered, and hold warm until ready to serve.


Serve with brown rice and/or garlic naan, and enjoy an Indian feast!


11/30/08 Update – I am submitting this post to a contest hosted by Joelen’s Culinary Adventures


Read Full Post »


The next Dinner Divas recipe is a Giada recipe for vegetable bolognese. I really enjoyed this sauce. You have to be a mushroom lover to enjoy it, though, which my husband and I both are. It’s really quick, too – you could easily make this on a weeknight. The main change I made was to use creme fraiche instead of mascarpone. I think mascarpone can be too sweet at times, plus I probably wouldn’t have found a use for the second half of the tub and it would have gone to waste. At first, I thought of substituting heavy cream, but when I saw that there was a substantial amount of wine in the sauce, I figured it would curdle. Luckily, the stars aligned and the week I decided to make this was also the week that my regular grocery store decided to start carrying creme fraiche. If you don’t know what creme fraiche is, it’s not as fancy as it sounds. It’s a slightly soured cream, kind of like sour cream, but not nearly as sour and not quite as firm. The awesome advantage of it is that you can add it cold to a hot sauce, even one containing an acid like wine, and it won’t curdle. I thought it made for a perfect substitution in this dish.

Other changes: I used fresh tri-colored linguine instead of dried rigatoni. I used dried thyme and oregano in place of fresh, simply because I can’t ever use up a whole package of those fresh herbs (maybe next year when I have a garden), and I added sliced basil for extra freshness.

This dish was a great way to transition into fall cooking on a day that was cold and rainy from the remnants of Hurricane Faye.

Adapted from: Giada deLaurentiis, Food Network

Tri-Colored Pasta with Vegetable Bolognese

ingredients

1-ounce dried porcini mushrooms

1 1/2 cups hot water

2 carrots, peeled and cut into chunks

½ large Vidalia onion, peeled and sliced into pieces

1 red bell pepper, seeded and cut into chunks

2 garlic cloves, peeled

1/4 cup olive oil

1 teaspoon dried thyme

½  teaspoon dried oregano

2 teaspoons salt

1 teaspoon freshly ground black pepper

5 ounces fresh cremini mushrooms, stemmed and sliced

2 tablespoons tomato paste

1/2 cup red wine

3 oz. crème fraiche

12 oz. package fresh tri-colored pasta (a pound would be a better fit for the amount of sauce, but the fresh pasta never seems to come in 1 lb. packages)

Large handful of fresh basil leaves, sliced thin

1/4 cup parmesan


directions

1. Place the dried mushrooms in a small bowl and cover with 1 ½ cups very hot tap water. Set aside and let the mushrooms soften for 30 minutes.

2. Place the carrots, onion, bell pepper, and garlic in a food processor. Process the vegetables until finely chopped but still chunky. Place the olive oil in a large, heavy skillet or dutch oven over medium-high heat. Add the chopped vegetables, thyme, oregano, salt, and pepper and cook until tender, about 6 minutes.

3. Strain the porcini mushrooms, reserving the porcini mushroom liquid. Slice any porcinis that are too large. Add the porcini mushrooms, fresh mushrooms, and tomato paste and continue cooking, stirring to dissolve the tomato paste, until the mushrooms are softened, about 5 minutes.

4. Add the porcini mushroom liquid and red wine. Bring the liquid to a boil, reduce the heat to low, and let the mixture simmer until the liquid is reduced somewhat, about 10 minutes. Remove pan from heat, stir in crème fraiche and half of the sliced basil and stir to incorporate.

5. Meanwhile, bring a large pot of salted water to a boil over high heat. Add the pasta and cook until al dente, stirring occasionally, about 3 minutes. Drain pasta and serve in shallow bowls topped with sauce. Garnish with remaining basil and parmesan.


Read Full Post »

Following up on the Vegetarian Week post from below, I also wanted to share the second great vegetarian dinner we had recently. This one, I felt, was a bit more “legit” as a vegetarian dinner than the pasta dish I posted below. I mean, sure, anyone can think of a tasty meatless pasta dish, especially if it’s one that has a cheesy, creamy sauce. This dish, though, is one of the healthiest, most balanced dinners I can think of and it was amazingly good. Ratatouille is one of those dishes that is truly much more than the sum of its parts. As you’re cooking it, you’re thinking “well, it’s just a bunch of sauteed vegetables – how exciting could it be?” But by the time you take a bite, all the flavors have blended and it tastes so good. This is also a surprisingly hearty and filling dish, for those who think they can’t get full without meat. I added cannellini beans to make it more nutritionally balanced, and I thought they were a great addition.

Adapted from: Emeril Lagasse, Food Network

ingredients

1/4 cup olive oil
1 small diced yellow onion
2 cloves minced garlic
2 baby eggplants, diced

1 diced green bell pepper
1 diced red bell pepper
1 large diced zucchini
1 large heirloom tomato, chopped

1 can cannellini or other white beans, drained and rinsed

1/2 teaspoon dried thyme
1 tablespoon thinly sliced fresh basil leaves
Salt and pepper


to serve:

Oven-baked brown rice

Grated parmesan for sprinkling


directions

1. Cut up everything! The most time-consuming part of this meal, by far.

2. Heat a large sauté pan over medium heat and add the olive oil. Once shimmering, add the onions to the pan. Cook the onions, stirring occasionally, until they are wilted and lightly caramelized, about 5 to 7 minutes.

3. Add the garlic, eggplant, and thyme to the pan and continue to cook, stirring occasionally, until the eggplant is partially cooked, about 5 minutes.

4. Add the green and red peppers and zucchini and continue to cook for an additional 5 minutes.

5. Add the tomatoes, beans, basil, and salt and pepper to taste, and cook for a final 5 minutes.

6. Serve over oven-baked brown rice with a sprinkling of parmesan.

Read Full Post »

One of the things my parents used to do in the summer when I was growing up was Vegetarian Week. It’s exactly what it sounds like – for one week, when summer produce was at its peak, we’d be vegetarians. I like vegetarian dinners and try to cook at least one a week normally. Hence, I’ve carried on this tradition in my own house. Lunches tend to be a bit more challenging during the week because they require a bit more creativity from normal sandwiches. This year, our Vegetarian Week got cut short because we had some unexpected meetings that cut into dinner time, but I did manage to make 2 vegetarian dinners that came out great. The first is this pasta dish that I just sort of dreamed up based on things my husband likes – asparagus, sauteed mushrooms, and blue cheese.

ingredients

2/3 lb. penne pasta

1 bunch asparagus, rinsed and ends snapped off

1 cup baby bella mushrooms, cleaned and sliced

5 oz. cambozola cheese, rind removed and cut into small chunks (If you haven’t tried this yet, you should – it’s a mixture of creamy camembert cheese, which is like brie, and gorgonzola, which is the mildest form of blue cheese. The result is a creamy, yummy cheese with a mild hit of blue cheese flavor.)

½ cup grated parmesan cheese

splash of red wine (you can also use white wine if you prefer – I just think red wine plays well with cambozola)

1 Tbsp. olive oil

2 Tbsp. butter

2 Tbsp. flour

1 cup milk (skim is definitely fine since you’re mixing in a bunch of cheese)

salt and pepper


directions


1. Prepare mushrooms – heat olive oil over medium-high heat until shimmering. Add mushrooms and sauté until golden and liquid is evaporated. To finish, add splash of wine and cook until nearly, but not fully, evaporated. Pour into a small bowl and set aside.

2. Boil and salt water for pasta and asparagus.

3. Meanwhile, cut asparagus into one inch pieces on an angle, to mimic the shape of the penne. Set aside.

4. Add pasta to boiling water and begin cooking. When pasta has 2 minutes of cooking time remaining, add the asparagus. Before draining, reserve a cup or so of the cooking water. If pasta and asparagus finish cooking before the sauce is done, toss in strainer with a small drizzle of oil and cover with a towel.

5. Meanwhile, prepare sauce. Melt the butter over medium heat, then sprinkle the flour over it. Whisk vigorously to cook the roux for one minute, until the color of peanut butter. Increase the heat to medium-high, then slowly add the milk in small batches, whisking vigorously the whole time to prevent lumps. Cook this sauce–whisking constantly–until it’s just starting to boil and thickens, about 10 minutes. Remove from heat (this is very important) and gently fold in the cambozola in small batches until it’s completely incorporated.  Next, add half of the parmesan cheese using the same method (a silicone spatula works well for the folding-in). Season with salt and pepper. Finally, stir in the mushrooms.

6. Return pan to a burner over very low heat, add the pasta and asparagus to the sauce and stir gently to coat, adding pasta water as needed to thin to desired consistency.

7. Sprinkle with remaining parmesan and serve!


Serves 2 with a lunch portion leftover.


Thanks to NestColleen on the cooking board I frequent for the cheese sauce tips!

Read Full Post »